A MagicMirror Photo Display
A build guide for creating an rotating image display using a Raspberry Pi 5 and MagicMirror2
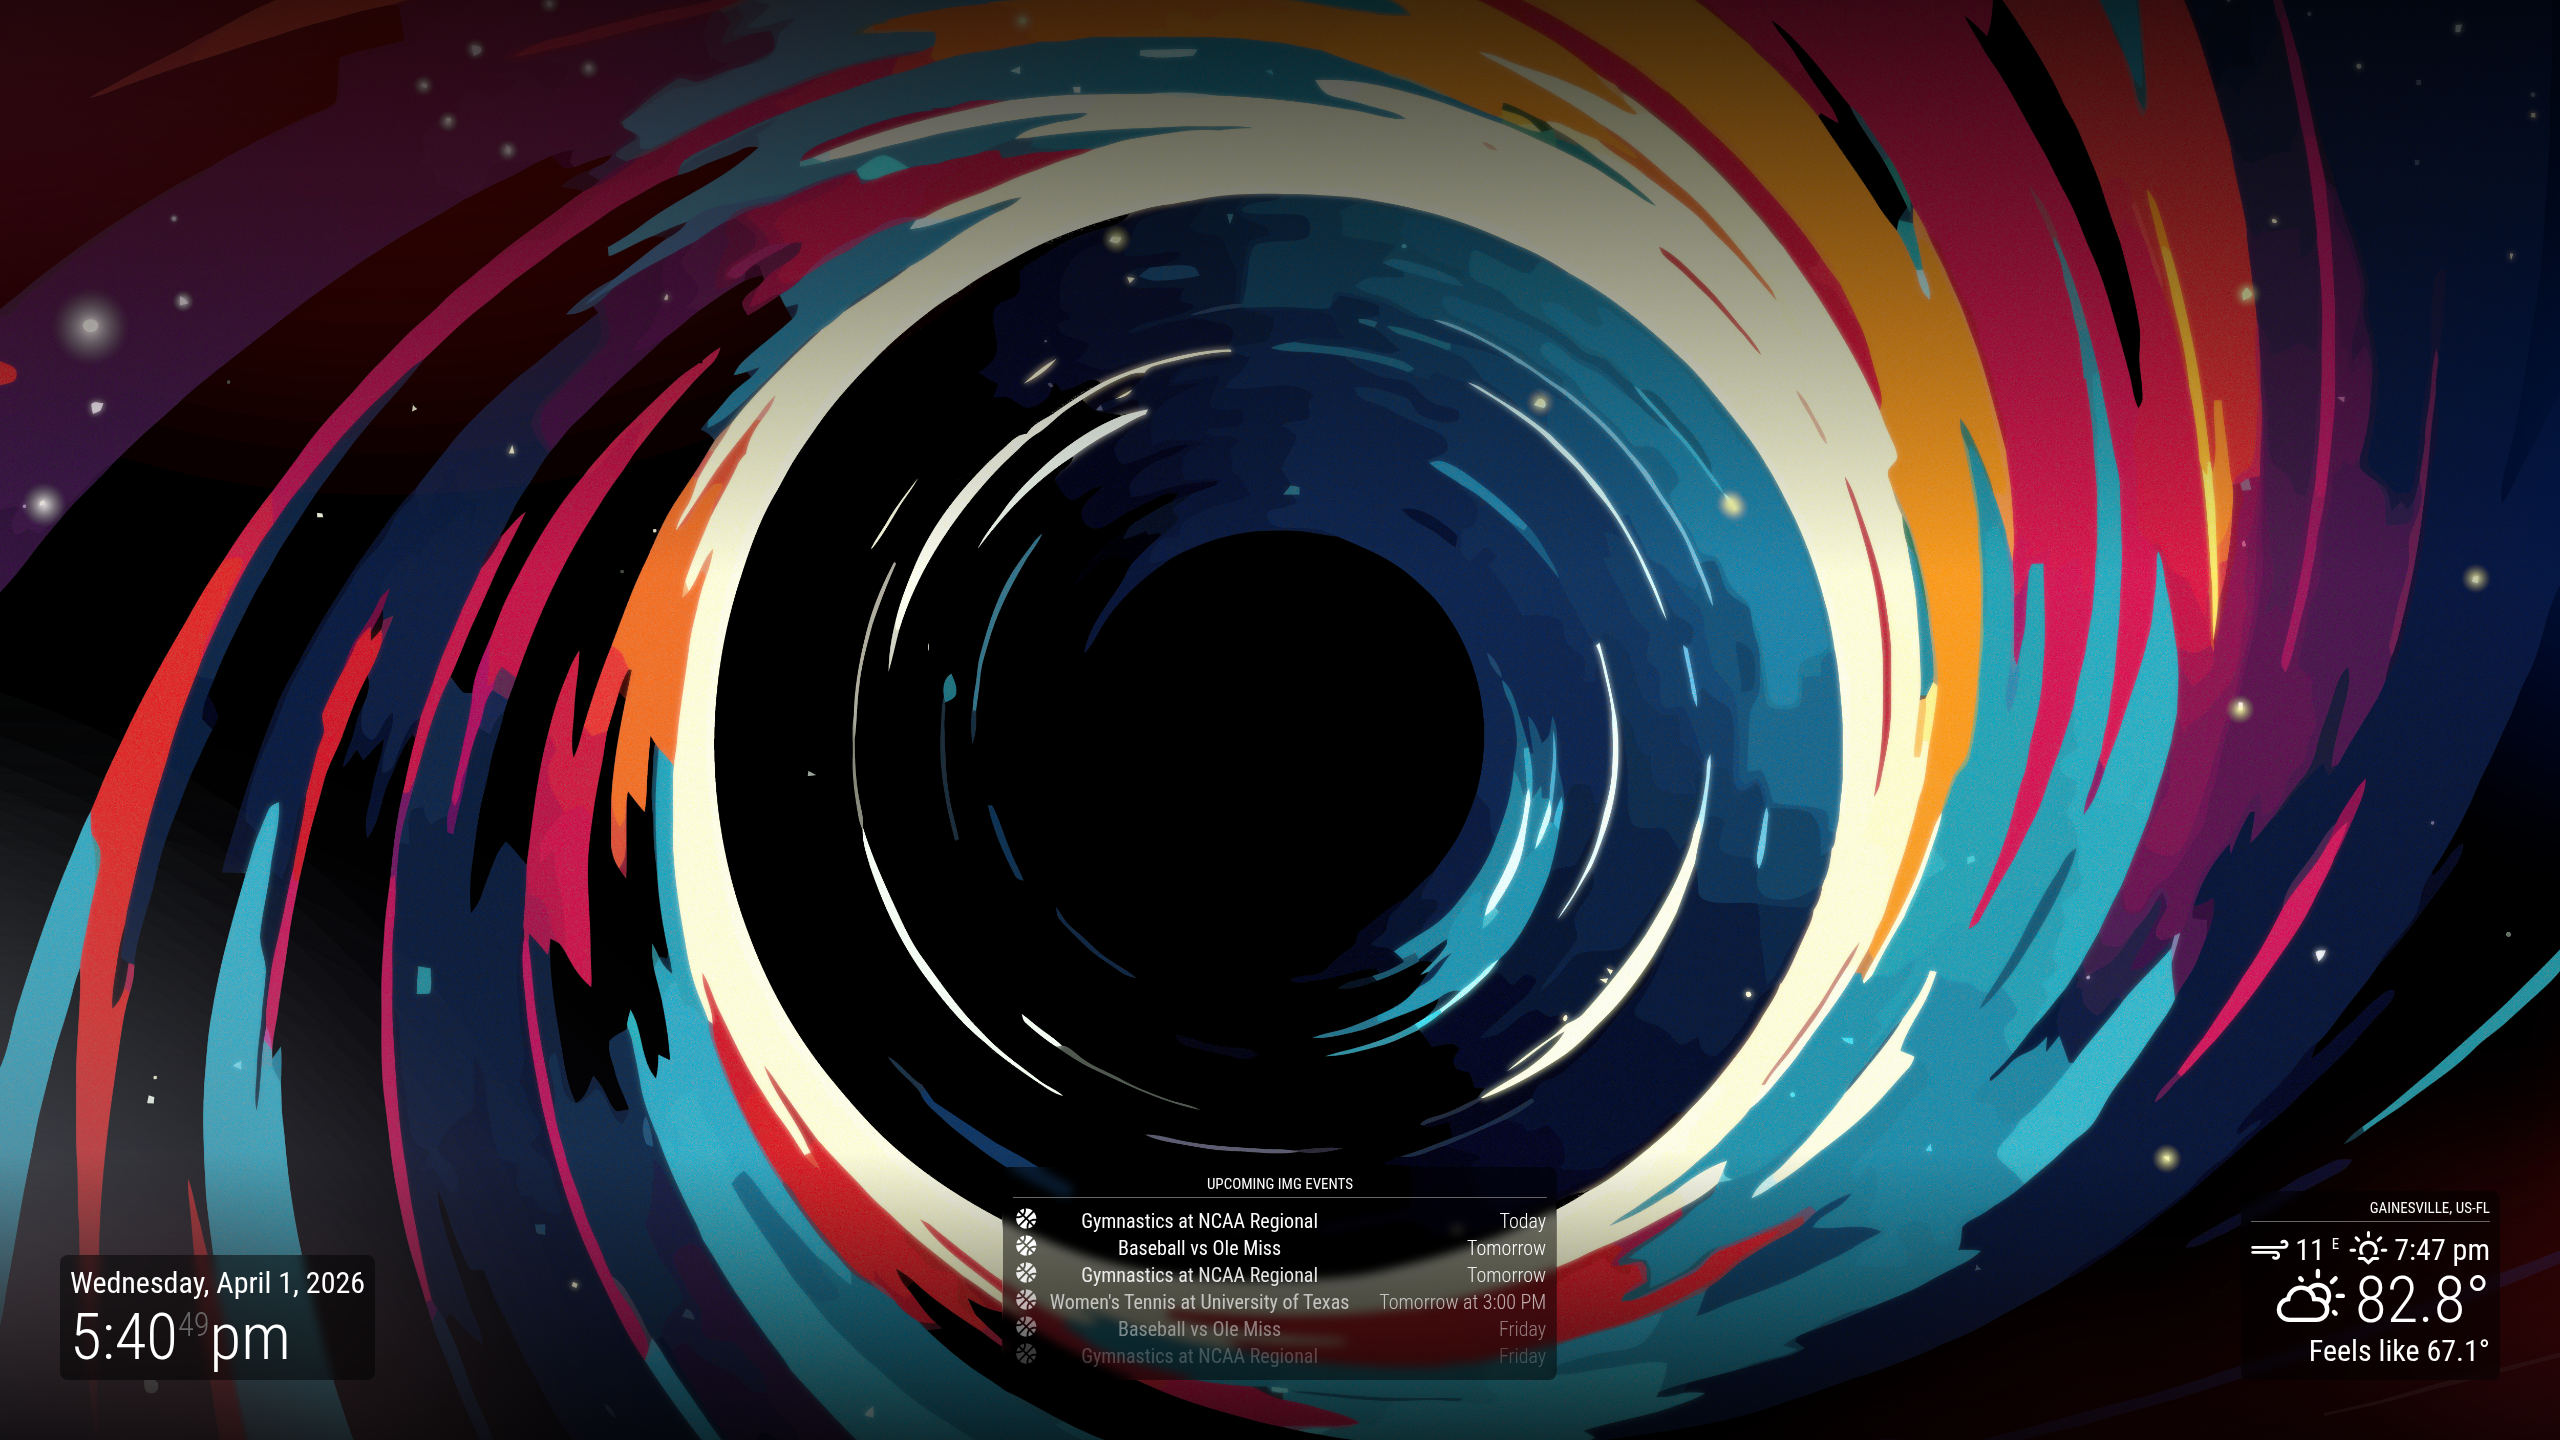
Slideshow Display with MagicMirror
Overview - Turning Old Displays into a New Gallery
Imagine walking into a lab and being greeted by a wall of bright, rotating images that showcase your latest posters, the newest papers, and the next big event for your research group. That’s exactly what I set out to create for the Interdisciplinary Microsystems Group (IMG) at the University of Florida: a low‑maintenance digital poster frame and events board powered by a Raspberry Pi 5 and the open‑source MagicMirror 2.
Why I’m doing it
IMG’s current wall‑mounted displays don’t work! The previous system ran on Raspberry Pi 1’s. It required manual uploads, Frequent intervention from crashes/bugs, and was just generally slow. The displays meant to be an ever‑present billboard for posters, news, and event announcements, but the hardware has become more of a headache than a resource. I wanted a solution that was:
- Reliable – no more sudden page errors or crashes
- Scalable – add more images or swap out the display without touching the hardware.
- Maintenance‑free – a “set it and forget it” system that keeps the wall up‑to‑date with minimal intervention.
The Pi 5’s performance and the modular design of MagicMirror make this vision achievable without breaking the bank.
How I’m doing it
The magic happens behind the scenes in three simple steps:
- Data sync – I use rclone to mirror a designated Google Drive folder onto the Pi. A cron job runs every 15 minutes, keeping the local image cache fresh without manual intervention.
- Display engine – MagicMirror 2 serves as the front‑end, but the real power comes from the MMM‑BackgroundSlideshow module. This module turns the entire screen into a dynamic photo album, handling image rotation, transition effects, and background customization.
- Automation & simplicity – With the cron job, rclone, and MagicMirror set up, the system is essentially unattended. Upload a photo to the Google Drive folder, wait 15 minutes, and watch it appear on the wall.
In the rest of this post I’ll walk you through the exact steps I took to configure each component, share useful configuration snippets, and highlight a few gotchas you’ll want to avoid. Whether you’re a fellow researcher, a maker in your own lab, or just curious about DIY digital signage, this guide will give you a roadmap to create a robust, cloud‑driven photo frame that keeps your wall fresh and engaging. Happy tinkering!
Setup
Materials Needed
A raspberry pi 3 or greater, we will use a Raspberry Pi 5 [1].
Micro HDMI to HDMI adapter (selected for the Pi 5).
HDMI Cable.
25W USB-C Power Adapter.
HDMI Capable Display.
A micro SD card, 32GB or greater.
A secondary computer with the Raspberry Pi Imager [2].
Means of flashing the micro SD card on the secondary computer. i.e. microSD to USB adapter.
A Folder on Google Drive with some Images.
Pi First-Time Setup
Flashing the MicroSD Card
OS Selection
Download the Raspberry Pi Imager (Ver 2.0.7 or later) on your secondary computer. Insert the micro SD card into the computer via adapter or microSD card slot. Open the Imager software and select the device model corresponding to the Pi you are using, in our case Raspberry Pi 5. Next, select an OS. MagicMirror requires the latest full version of Raspberry Pi OS [3]. A desktop environment is necessary for this to work. As a result, the “Lite“ version of Raspberry Pi OS is unsupported. Similarly, older versions of RPi OS based on Debian Buster are no longer supported. After OS, select the storage device being imaged. Our microSD card should appear as a Mass Storage Device with the approximate size of our storage.
Customization
The latest Raspberry Pi Imager allows you to setup initial configuration options. Here are a few I recommend completing.
Localization and Timezone.
Hostname, username, and password.
Enable SSH with username and password
Wi-Fi credentials (skip for now if on a managed network. i.e campus Wi-Fi)
Updating the Pi
Open a terminal session and enter the following to update the software packages on the Pi. This will likely take a few minutes, especially over Wi-Fi or while using older devices. If prompted, enter the password setup for the Pi. For more information, check out the manual page for apt or run man apt in the terminal [4]. Additionally, you can checkout the documentation from Raspberry Pi foundation has for updating software and firmware [5]
NOTE:
This command can take a long time to process, often with little feedback.
1
sudo apt update && sudo apt full-upgrade -y
To clean up after our updates, lets run the following commands
1
sudo apt autoclean && sudo apt autoremove -y
Software Installation
Automated Software Setup
I have created a bash script to automate the process below. You can use the following line of code to perform all the actions, although you interaction is still required for setup process. All the actions taken in the script are explained below this section.
1
bash <(curl -sSL https://raw.githubusercontent.com/DieterSteinhauser/MagicMirror-Slideshow-Quickstart/refs/heads/master/setup_mirror.sh)
Setup Cloud Synced Folder
To sync our files to the Pi, we are going to use rclone to communicate with a cloud storage provider. For the example, we will use Google Drive. For more information on how rclone works, check out their documentation page [6].
Install Rclone
1
sudo apt install rclone -y
Configure Remote Connection
Go through the setup wizard with the next command
1
rclone config
- Choose
nfor a “New Remote” - Give it a Name, i.e.
gdrive - Select the number corresponding to the cloud provider, in our setup
18was google drive but in can change based on rclone versions. - Leave
cliend_idandclient_secretblank (just press enter) - For scope choose
1for Full Access. This can be restricted to read only for our purposes. - Select
Nofor advanced Config - Select
Yesfor auto config - A browser will open, log into the cloud account to grant permission
- Confirm settings and exit with
q
Create the Local Folder
Now we can create a local folder that will sync to the cloud storage
1
mkdir -p ~/MirrorPhotos
Test the Sync
Now we check if rclone is syncing our files with the following command
1
rclone sync gdrive:YourDriveFolderName ~/MirrorPhotos -v
Setup a Cron Job to Sync Periodically
Enter the crontab
1
crontab -e
Scroll to the bottom and add this line to sync every 15 minutes
1
*/15 * * * * rclone sync gdrive:YourDriveFolderName ~/MirrorPhotos
Installing Magic Mirror
Enter the installation script supplied here and run the following command [7]:
NOTE:
This command can take a long time to process, often with little feedback.
1
bash -c  "$(curl -sL https://raw.githubusercontent.com/sdetweil/MagicMirror_scripts/master/raspberry.sh)"
During setup, name the process to use the default MagicMirror and allow pm2 to be used to autostart the service when the Pi is powered on. After entering a few configuration options, you will be left with
Managing the Service
The installation script has setup MagicMirror to run automatically. However, if we need to make any changes to the system or the configuration of our MagicMirror dasboard, it is useful to know how to exit the service. Here are a few keyboard shortcuts useful for managing the service:
F11to exit fullscreen modeCtrl + Qto quit the service, The pm2 daemon will want to start the service again but you will have enough time to start a terminal session.Ctrl + Shift + Tmay open a terminal tab on after a recent reboot of the machine.
The installation script uses PM2 as the daemon process manager for MagicMirror. The following commands are useful in managing the application.
1
2
# Start the Magic Mirror Application
pm2 start MagicMirror
1
2
# Stop the Magic Mirror Application
pm2 stop MagicMirror
Installing the Background Slideshow Module
Lets stop the MagicMirror Application while we install the Slideshow Module.
1
pm2 stop MagicMirror
Navigate to ~/MagicMirror/modules to install the MMM-BackroundSlideshow [8].
1
2
3
4
cd ~/MagicMirror/modules/
git clone https://github.com/darickc/MMM-BackgroundSlideshow
cd MMM-BackgroundSlideshow
npm install
After npm install, you may need to run npm audit fix once or twice to fix issues with dependencies.
Configuring the Dashboard
Navigate to ~/MagicMirror/config to edit the config.js file for adjusting the MagicMirror Dashboard.
1
cd ~/MagicMirror/config
NOTE: Text Editors
You can edit the file with the text editor of your choice.nanocan work for quick edits, or VS code can be installed for a GUI interface.Nano
VS code
to run code in the current directory
code .
Edit config.js
1
2
3
4
5
6
7
8
9
10
11
12
13
14
15
16
17
18
19
20
21
22
23
24
25
26
27
28
29
30
31
32
33
34
35
36
37
38
39
40
41
42
43
44
45
46
47
48
49
50
51
52
53
54
55
56
57
58
59
60
61
62
63
64
65
66
67
68
69
70
71
72
73
74
75
76
77
78
79
80
81
82
83
84
85
86
87
88
89
90
91
92
93
/* Config Sample
 *
 * For more information on how you can configure this file
 * see https://docs.magicmirror.builders/configuration/introduction.html
 * and https://docs.magicmirror.builders/modules/configuration.html
 *
 * You can use environment variables using a `config.js.template` file instead of `config.js`
 * which will be converted to `config.js` while starting. For more information
 * see https://docs.magicmirror.builders/configuration/introduction.html#enviromnent-variables
 */
let config = {
	address: "localhost",	// Address to listen on, can be:
							// - "localhost", "127.0.0.1", "::1" to listen on loopback interface
							// - another specific IPv4/6 to listen on a specific interface
							// - "0.0.0.0", "::" to listen on any interface
							// Default, when address config is left out or empty, is "localhost"
	port: 8080,
	basePath: "/",	// The URL path where MagicMirror² is hosted. If you are using a Reverse proxy
									// you must set the sub path here. basePath must end with a /
	ipWhitelist: ["127.0.0.1", "::ffff:127.0.0.1", "::1"],	// Set [] to allow all IP addresses
									// or add a specific IPv4 of 192.168.1.5 :
									// ["127.0.0.1", "::ffff:127.0.0.1", "::1", "::ffff:192.168.1.5"],
									// or IPv4 range of 192.168.3.0 --> 192.168.3.15 use CIDR format :
									// ["127.0.0.1", "::ffff:127.0.0.1", "::1", "::ffff:192.168.3.0/28"],

	useHttps: false,			// Support HTTPS or not, default "false" will use HTTP
	httpsPrivateKey: "",	// HTTPS private key path, only require when useHttps is true
	httpsCertificate: "",	// HTTPS Certificate path, only require when useHttps is true

	language: "en",
	locale: "en-US",   // this variable is provided as a consistent location
			   // it is currently only used by 3rd party modules. no MagicMirror code uses this value
			   // as we have no usage, we  have no constraints on what this field holds
			   // see https://en.wikipedia.org/wiki/Locale_(computer_software) for the possibilities

	logLevel: ["INFO", "LOG", "WARN", "ERROR"], // Add "DEBUG" for even more logging
	timeFormat: 12,
	units: "imperial", // "metric",

	modules: [

		{
			module: "clock",
			position: "bottom_left"
		},
		{
			module: "calendar",
			header: "Upcoming IMG Events",
			position: "bottom_center",
			config: {
				maximumEntries: 6,
				//showLocation: true,
				maxTitleLength: 50,
				// fontawesome icons https://fontawesome.com/search
				customEvents: [{keyword: 'Florida Gators', symbol: 'basketball', color: 'Green', transform: { search: 'Florida Gators' , replace: ''}}],
				calendars: [
					{
						fetchInterval: 7 * 24 * 60 * 60 * 1000,
						// symbol: "calendar-check",
						// url: "https://ics.calendarlabs.com/76/mm3137/US_Holidays.ics" // US Holidays
						//url: "https://www.img.ufl.edu/calendar/ical/img-calendar.ics"  // IMG Calendar
						url: "webcal://calendar.ufl.edu/live/ical/events/exclude_group/Admin/exclude_tag/closed%20event/category/Athletics/header/Athletics%20Events" // UF Athletics
					}
				]
			}
		},

		{
			module: "weather",
			position: "bottom_right",
			config: {
				weatherProvider: "openmeteo",
				type: "current",
				lat: 29.643389,
				lon: -82.347583
			}
		},
		{
		module: 'MMM-BackgroundSlideshow',
		position: 'fullscreen_below', // Keeps it behind all other modules
		config: {
			imagePaths: ['/home/pi/MirrorPhotos/'], // Use the full path to your folder
			transitionImages: true,
			slideshowSpeed: 30000, // Change image every 30 seconds
			randomizeImageOrder: true,
			backgroundSize: 'cover', // Or 'contain' if you don't want cropping
		}
		},
	]
};

/*************** DO NOT EDIT THE LINE BELOW ***************/
if (typeof module !== "undefined") { module.exports = config; }
Edit custom.css
Edit the custom.css file in the ~/MagicMirror/config directory to make text more legible over the background
1
2
3
4
5
6
7
8
9
10
11
12
13
14
15
16
.normal,
.dimmed,
header,
body {
  color: #fff;
}

/* Targets only the HUD modules */
.module.clock,
.module.calendar,
.module.weather {
  background-color: rgba(0, 0, 0, 0.5);
  padding: 10px;
  border-radius: 8px;
  backdrop-filter: blur(5px);
}
Always-On Display
1
2
3
4
5
6
7
8
9
10
11
12
13
14
15
echo -e "${BLUE}Disabling Screen Blanking (Always-On Display)...${NC}"
AUTOSTART_FILE="$HOME/.config/lxsession/LXDE-pi/autostart"

# Ensure the directory exists
mkdir -p "$(dirname "$AUTOSTART_FILE")"

# Create file if it doesn't exist
touch "$AUTOSTART_FILE"

# Add xset commands if they aren't already there
for cmd in "@xset s off" "@xset -dpms" "@xset s noblank"; do
    if ! grep -qxF "$cmd" "$AUTOSTART_FILE"; then
        echo "$cmd" >> "$AUTOSTART_FILE"
    fi
done
Reboot and Enjoy!
1
sudo reboot
Further Reading
- Raspberry Pi Datasheet (https://pip-assets.raspberrypi.com/categories/892-raspberry-pi-5/documents/RP-008348-DS-6-raspberry-pi-5-product-brief.pdf?disposition=inline)
- Raspberry Pi Imager (https://www.raspberrypi.com/software/)
- MagicMirror Documentation (https://docs.magicmirror.builders/)
- Apt Manual (https://linux.die.net/man/8/apt-get)
- Raspberry Pi Foundation Documentation (https://www.raspberrypi.com/documentation/computers/os.html)
- Rclone Documentation (https://rclone.org/docs/)
- MagicMirror Scripts (https://github.com/sdetweil/MagicMirror_scripts)
- MMM-BackgroundSlideshow (https://github.com/darickc/MMM-BackgroundSlideshow)